
Building an earthworm observation station is easier than you might think. You don’t need to be a scientist or an expert gardener—just a little creativity and some basic materials. Think of it like setting up a mini-lab in your backyard. You’ll not only get to observe earthworms but also deepen your appreciation for nature. So, grab a cup of coffee, and let’s dig into the details!
What You’ll Need to Set Up Your Station
Before you start building, it’s important to gather your materials. You don’t need a ton of fancy equipment, but having the right tools will make your experience smoother. Here’s a handy list to get you started:
- Clear Container: A large glass jar or plastic bin will do. Make sure it’s big enough for a few worms to move around comfortably.
- Soil: You’ll need nutrient-rich soil, preferably from your garden or local compost. This will create a natural environment for the worms.
- Earthworms: You can collect them from your yard or purchase them from a garden store.
- Water Spray Bottle: This will help keep the soil moist without soaking it.
- Instructions for Observation: A little notebook to jot down your findings—this helps you track what you see over time!
With these materials in hand, you’re ready to set up your earthworm observation station!
Choosing the Right Location
Finding the perfect spot for your observation station is just as important as the materials. You want an area that’s not too hot or too cold and has some natural light to mimic their typical habitat. Here are a few tips for choosing the best location:
– **Shady Spots:** Earthworms thrive in cooler, damp environments, so consider placing your station in a shaded area of your garden. This will help prevent the soil from drying out too quickly.
– **Level Ground:** Make sure to put your container on level ground. This keeps water from pooling in one area and ensures that the worms have enough space to move around.
– **Accessibility:** You’ll want to be able to easily check on your worms and record your observations. Choosing a location that’s close to your home makes this task much easier.
By following these guidelines, you’ll set up a welcoming home for your earthworms.
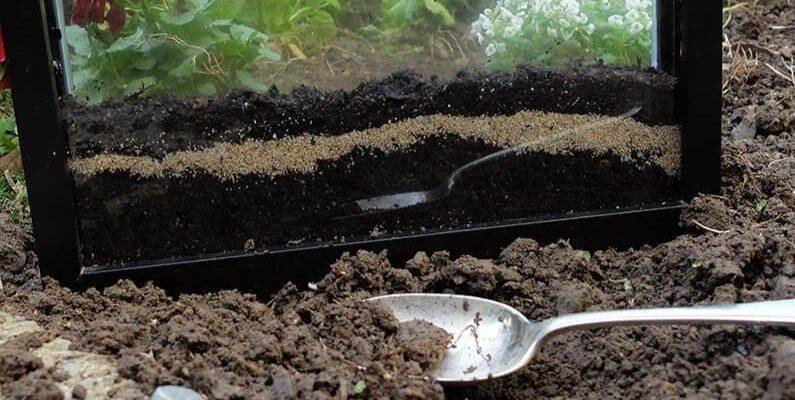
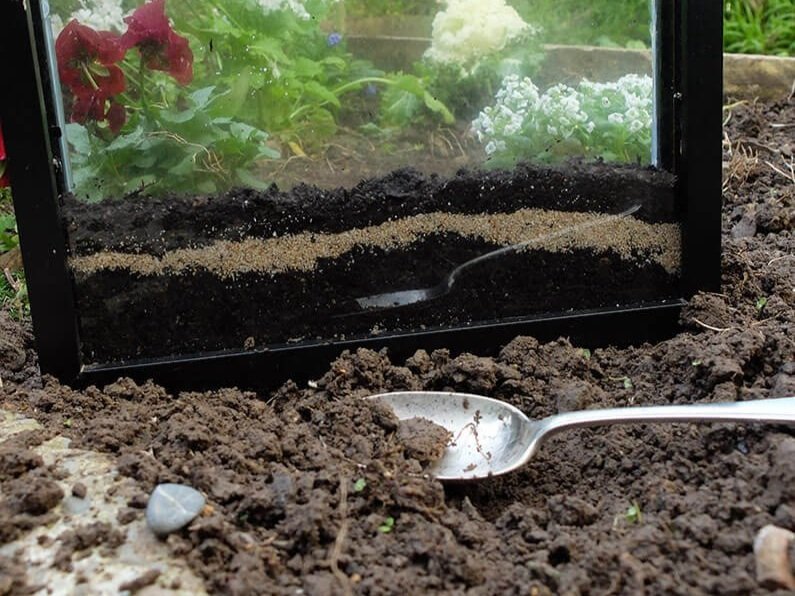
Setting Up the Earthworm Observation Station
Now that you’ve got your materials and chosen the perfect spot, it’s time to set up your observation station. Here’s a step-by-step guide to make it simple:
1. **Layer the Soil:** Start by adding a layer of soil, about 4-6 inches deep, to your container. This gives the worms plenty of room to burrow and explore.
2. **Add Moisture:** Use your spray bottle to dampen the soil lightly. It should be moist, not soaking wet, as worms breathe through their skin and need a humid environment.
3. **Introduce the Earthworms:** Carefully add your earthworms into the prepared soil. Gently place them in different areas to encourage exploration.
4. **Cover It Up:** If you want, you can add a lid or cover to your container. Just make sure it allows for some airflow, as worms need oxygen too!
Your earthworm observation station is now ready!
Observing Your Earthworms
With everything in place, the fun really begins. Observing earthworms is not just about watching them wriggle around; it’s about discovering their behaviors and understanding their importance in our ecosystem. Here’s how you can make the most of your observation time:
– **Set a Schedule:** Try to observe your earthworms at different times of the day. Are they more active in the morning or afternoon? Keeping a record will help you see any patterns.
– **Look for Movement:** Earthworms are fascinating in their movements. Notice how they push their way through the soil and leave behind trails. This aeration helps plants grow!
– **Take Notes:** Jot down any interesting behaviors or changes over time. If you notice them gathering at one spot, it could be due to moisture or food sources in that area.
By regularly observing your earthworms, you’ll gain insights into their lives and appreciate their role in maintaining healthy soil.
Understanding Earthworm Behavior
You might be wondering, “What exactly do earthworms do?” Well, they’re often called nature’s tillers. Here’s why they matter so much:
– **Soil Aeration:** As earthworms burrow through the soil, they create tunnels. These tunnels improve air circulation and help water penetrate deeper, which benefits plant roots.
– **Nutrient Recycling:** Earthworms eat organic matter, like decaying leaves, and break it down into nutrient-rich compost. This process enriches the soil, promoting healthier plant growth.
– **Food Source:** They’re also a crucial part of the food chain. Birds and other wildlife rely on earthworms for sustenance, making them vital to the ecosystem.
Understanding these behaviors can increase your appreciation for these little creatures and their incredible contributions.
Common Issues and Troubleshooting
As you dive into your observation journey, you may encounter a few challenges. Here’s how to tackle some common problems:
– **Dry Soil:** If the soil seems dry, give it a light spray with water. Just remember, too much moisture can drown the worms, so find a balance!
– **Overcrowding:** If you’ve added too many worms, they might compete for food and become stressed. It’s best to have just a few worms in your observation station at a time.
– **Unpleasant Odors:** If you notice a foul smell, it could mean the worms are dying. Check the soil moisture and ensure there’s enough organic matter for them to eat.
By paying attention to these issues, you can create a healthier environment for your earthworms and improve your observation experience.
Expanding Your Knowledge and Sharing the Experience
The beauty of building an earthworm observation station is that it’s an interactive learning experience, not just for you but for others too. Here are some ideas on how to share what you’ve learned:
– **Invite Friends:** Host an “earthworm day” where you invite friends or family to come check out your observation station. Share your findings and let them know about the importance of these creatures.
– **Start a Journal:** Keep a detailed journal of your observations, including sketches or photos. This can be a great way to reflect on your experiences over time.
– **Connect with Local Schools:** If you’re passionate about earthworms, consider collaborating with local schools. You could set up a mini-exhibit where students can learn about worms and their role in the ecosystem.
By sharing your knowledge, you’ll not only deepen your understanding but also inspire others to appreciate the wonders of nature.
Building an earthworm observation station opens up a world of possibilities. It’s about more than just observing; it’s about connecting with nature and fostering a love for the environment. So, grab your materials and get started—you might just uncover some incredible insights along the way!