
Now, when you think about starting an earthworm farm, you might wonder about the details. What do you need? Where do you start? There’s a lot to consider, but don’t worry! By the end of this, you’ll have a clear plan to set up your own classroom earthworm farm. We’ll cover everything from choosing the right **earthworm species** (like the popular red wiggler) to the best materials for a healthy habitat. Ready to dig in? Let’s get started!
Choosing the Right Worm Species
When you’re starting an earthworm farm, the first step is choosing the right type of worm. The European nightcrawler and the red wiggler are two of the most popular species for composting. But why these guys?
**Red wigglers** are particularly great because they thrive in decaying organic matter, making them perfect for composting. They’re small, friendly, and can process a lot of waste—up to half their body weight each day! That means if you have a classroom of 30 kids, you can handle a decent amount of food scraps.
On the other hand, European nightcrawlers are larger and can also be used for fishing bait. They prefer a slightly different environment and can dig deeper into the soil, which isn’t necessary if you’re keeping your farm in a bin. So, for classroom projects, red wigglers are usually the way to go. They’re like the all-stars of composting worms!
Setting Up the Worm Bin
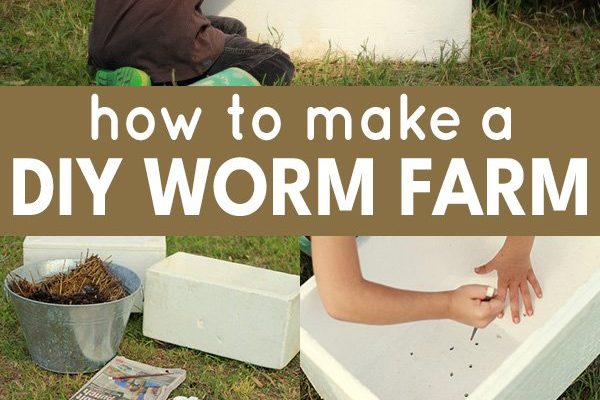
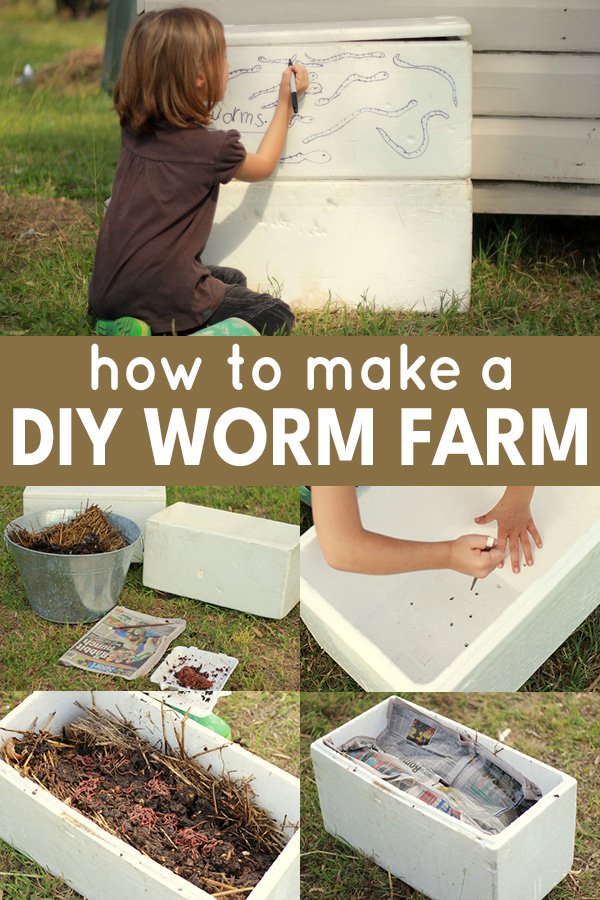
Now that you’ve chosen your worm species, it’s time to set up their new home. You can build your own worm bin or buy one. If you like DIY projects, grab a plastic tub with a lid—something around 10 to 20 gallons works great. The lid keeps the worms moist and protects them from other critters.
Here’s how to get your bin ready:
- Drill small holes in the lid and sides for airflow.
- Line the bottom with a few inches of damp newspaper or coir (coconut fiber). This serves as bedding.
- Add a handful of soil to give the worms a little grit, which helps them digest food.
Once your bin is ready, it’s time for the worms to move in! Gently place them on top of the bedding, and let them dig down and get comfortable. It’s like welcoming a new family to their cozy home!
Feeding Your Earthworms
Feeding your earthworms is crucial for their health—and for successful composting. They can munch on various kitchen scraps, but there are some important dos and don’ts.
**What to feed them:**
- Fruit and vegetable scraps (like peels, cores, and old bits).
- Coffee grounds and filters.
- Eggshells crushed into small pieces—they provide calcium.
**What to avoid:**
- Meat and dairy products (they attract pests).
- Citrus peels (too acidic).
- Oils and greasy foods (they can harm the worms).
Honestly, you might be thinking that feeding worms is a hassle, but it can be a fun routine. Encourage your students to collect scraps during lunch and share in the joy of recycling! Just remember to keep an eye on the bin and adjust the amount of food as needed. If the scraps aren’t disappearing, you might be overfeeding.
Maintaining the Right Conditions
Next up is keeping the earthworm environment just right. Worms are pretty simple creatures, but they do need specific conditions to thrive.
**Temperature is key.** Aim for a comfortable range of 60°F to 75°F (about 15°C to 24°C). Too hot or too cold, and your worms might get sluggish or even die. If your classroom is too warm, consider putting the bin in a cooler spot or using insulation.
**Moisture is important, too.** The bedding should feel like a damp sponge—moist but not dripping. If it’s too dry, the worms will struggle; too wet, and you risk drowning them. Check the moisture level regularly, and add a bit of water if it feels dry or add extra bedding if it’s too soggy.
You might also want to teach your students about the importance of aeration. Every couple of weeks, gently fluff the bedding with a garden fork to let fresh air circulate. It’s a great way to involve them and fosters that sense of responsibility!
Harvesting Worm Castings
After a few months, you’ll be ready to reap the rewards of your earthworm farm: **worm castings**! These nutrient-rich droplets are like gold for plants. You can use them in your school garden or even give them away to parents or the community.
To harvest, follow these steps:
- Stop feeding the worms for a couple of weeks to encourage them to concentrate in one area.
- Carefully move the bedding and worms to one side of the bin.
- Scoop out the castings from the other side. You can use them directly or mix them with soil.
When removing the castings, you might find some worms mixed in. Don’t worry! Just return them to the bin, and they’ll keep doing their composting magic. Harvesting can be a fun and educational experience for the students, showing them the literal fruits of their labor.
Common Challenges and Troubleshooting
Like any pet project, an earthworm farm might come with its share of challenges. Let’s address a few common issues you might encounter.
**Odors:** If your bin smells bad, it usually means you’ve overfed the worms or there’s excess moisture. Adjust the feed and check the moisture levels to solve this problem.
**Pests:** Fruit flies or other pests might show up if food scraps are left too long. To combat this, ensure you bury the scraps in the bedding to keep them from attracting unwanted guests.
**Worm Escape Artists:** Occasionally, worms might try to escape if the conditions aren’t suitable (like if it’s too hot). If you find your worms climbing out, check the temperature and moisture levels in the bin.
Addressing these issues promptly will keep the farm running smoothly, teaching students valuable lessons about troubleshooting and adapting.
Integrating Earthworm Farming into the Classroom Curriculum
One of the best things about having an earthworm farm in the classroom is the endless learning opportunities. Here are a few ways you can integrate it into various subjects:
**Science:** Study ecosystems, decomposition, and soil health. Students can conduct experiments to see how worms break down organic matter and how that helps plants grow.
**Math:** Worm farming can involve measuring food scraps and calculating how much waste is being recycled. You can even gauge how many worms you have and track their population over time.
**Art:** Have students create drawings or models of worms, or even design a worm-themed mural for the classroom. It’s a fun, creative way to celebrate your little squirmy friends!
By linking earthworm farming to multiple subjects, you’ll help students see real-world applications of what they learn. Plus, it makes the whole experience more engaging and enjoyable for everyone involved!
Final Thoughts on Your Classroom Earthworm Farm
Building a classroom earthworm farm can be a rewarding experience, both for you and your students. It’s not just about growing worms; it’s about instilling a sense of responsibility, curiosity, and environmental awareness in young minds. By following these steps, you’ll create a thriving ecosystem right in your classroom—a beautiful example of nature’s recycling process.
So grab your materials, get your worms, and start this exciting journey. Your classroom earthworm farm is bound to become a favorite project that teaches lifelong lessons. Happy composting!