
Imagine you’ve just received a batch of silkworm eggs from a reputable source like the Italian company “Bologna Silkworms.” You’re excited to start this new adventure, but you might be wondering how to give your little silkworms the best chance of thriving. Storing and incubating silkworm eggs properly can seem a bit daunting, but don’t fret! In this guide, I’ll walk you through everything you need to know in simple, easy-to-understand terms.
Understanding Silkworm Eggs
Before diving into storage and incubation techniques, let’s talk about what silkworm eggs are and why they need special care. Silkworm eggs are the initial stage in the life cycle of the Bombyx mori, the most widely used species for silk production. Each tiny egg contains a growing embryo that, when provided with the right conditions, will eventually hatch into a caterpillar.
These eggs might look harmless, but inside, they hold the potential for a whole army of silkworms. You’ll want to maintain the right temperature and humidity levels to ensure successful hatching. Think of it like trying to bake a cake; if the temperature is off, the cake might never rise. The same goes for silkworm eggs. Proper care is essential for a successful hatch.
Storing Silkworm Eggs
When you first get your silkworm eggs, the way you store them is crucial. They need a cool, dry place that’s free from direct sunlight. You might want to consider using a refrigerator, as it helps maintain a stable temperature. Ideally, store them at a temperature between 0°C to 5°C (32°F to 41°F).
Here’s what to do when you receive your eggs:
- Keep them in an airtight container to protect them from moisture.
- Label the container with the date of receipt and the type of eggs.
- Avoid frequent opening of the container to maintain a consistent environment.
It’s important not to place your eggs directly in the freezer or expose them to excessive heat. If you’re planning to use them in the near future, this method will help maintain their viability until you’re ready to incubate.
Preparing for Incubation
Once you’re ready to start incubating your silkworm eggs, you’ll want to gather a few essential items. Just like prepping for a camping trip, having the right gear will set you up for success. Here’s what you’ll need:
- A suitable incubation box or container with ventilation holes.
- A thermometer and hygrometer to monitor temperature and humidity.
- A reliable heat source if your room temperature isn’t ideal.
You’ll want to aim for a temperature of around 25°C to 28°C (77°F to 82°F) and keep the humidity level between 60% to 70%. To achieve this, you can use a simple humidity tray with water or a sponge inside the container. Just be careful not to let the eggs get wet—too much moisture can cause them to mold or drown.
Incubation Steps
Now that you have everything set up, let’s get down to the actual incubation process. Here’s a simple step-by-step guide to follow:
1. Place the Eggs: Carefully transfer the silkworm eggs into your prepared incubation box. Make sure they’re spread out, so air can circulate well around them.
2. Monitor Conditions: Regularly check the temperature and humidity using your thermometer and hygrometer. Adjust the heat source or humidity tray as needed.
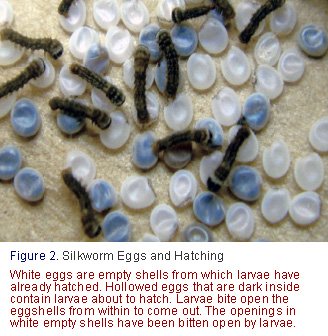
3. Wait for Hatching: The silkworm eggs will typically hatch within 10 to 14 days, depending on the temperature. Keep an eye on them, and you’ll start to see tiny caterpillars emerging!
4. Feed the Caterpillars: Once they hatch, they’ll need food right away. Fresh mulberry leaves are the preferred diet for silkworms, so have those ready to go.
Common Problems and Solutions
You might run into a few hiccups while storing and incubating your silkworm eggs. Here are some common problems and how to tackle them.
– Low Hatching Rate: If you notice that not many eggs are hatching, you might have had temperature fluctuations during storage or incubation. Try to maintain a steady environment, and consider that old eggs have a lower hatch rate.
– Mold Growth: Too much humidity can lead to mold, which can be harmful. If you spot any mold, remove the affected eggs immediately, and lower the humidity in your incubation box.
– Deformed Caterpillars: This can happen if the eggs experience extreme temperature changes. To avoid this, ensure that your setup remains consistent and that you’re using a reliable thermometer.
Incubation vs. Storing: Key Differences
Understanding the difference between storing and incubating silkworm eggs is essential for success. Storing is all about keeping the eggs dormant and viable for future use, while incubation is when you actively create the conditions for hatching.
Here’s a quick comparison:
| Storing | Incubating |
| Cool, dry environment | Warm, humid environment |
| Temperature: 0°C to 5°C | Temperature: 25°C to 28°C |
| Maximize egg longevity | Initiate hatching |
Remember, each phase serves a distinct purpose, and knowing when to transition from one to the other is key to your silkworm rearing journey.
Taking care of silkworm eggs might seem intricate at first, but once you get the hang of it, it can be a rewarding experience. Like most things in life, the secret often lies in preparation and attention to detail. By storing them properly and understanding the incubation process, you’ll be well on your way to nurturing those adorable caterpillars. With a little care and patience, you can witness the fascinating transformation from egg to silkworm. So, grab those eggs, set up your incubation station, and let the magic of silk production begin!