
So, how do you get started? First off, you’ll need to get your hands on a reliable silkworm variety. The most popular choice is the *Bombyx mori*. They’re known for being hardy and produce excellent silk. Don’t worry; I’ll guide you through all the essentials, from setting up their habitat to managing their lifecycle. Let’s dive in!
Understanding the Lifecycle of Silkworms
Before you begin breeding silkworms, it’s essential to know their lifecycle. These fascinating creatures go through four main stages: egg, larva, pupa, and adult moth.
– Egg Stage: It all begins with tiny, dot-sized eggs. If you’re buying them, ensure they come from a reputable source, and store them in a cool, dry place until you’re ready to hatch them.
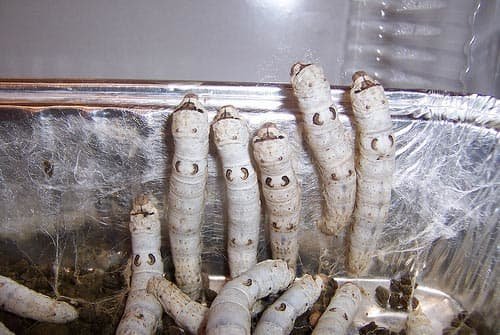
– Larval Stage: Once the eggs hatch, you’ll get silkworm larvae, which are ravenous eaters. This stage lasts about 5-6 weeks, during which your silkworms will grow rapidly. This is their “eating machine” phase; they love mulberry leaves (and you’ll need a lot!).
– Pupal Stage: After the larva has eaten enough, it will find a quiet spot and spin a cocoon. This is where the magic of silk happens. The larva transforms into a pupa inside the cocoon.
– Adult Moth Stage: Finally, the pupa transforms into an adult moth, ready to mate and start the cycle all over again.
Understanding this lifecycle helps you anticipate what to expect and how to care for each stage.
Setting Up the Perfect Habitat
Creating a comfortable environment for your silkworms is crucial. Here’s what you need:
– Container: Use a breathable container, like a cardboard box, or simple bins with ventilation holes. Good airflow prevents mold and keeps the silkworms healthy.
– Temperature: Silkworms thrive in warmer temperatures, ideally between 75°F to 85°F (24°C to 29°C). Too cold, and they may not grow; too hot, and they can die. A consistent temperature is key, so consider using a thermometer.
– Humidity: They prefer a humidity level of around 60-70%. A good way to maintain humidity is to lightly mist the habitat with water, but don’t overdo it! Too much moisture can cause mold.
– Lighting: Believe it or not, silkworms benefit from a regular light cycle. Keep them in a well-lit area during the day but avoid direct sunlight.
So, once you have your setup ready, you can focus on what matters most: feeding and caring for your silkworms.
Feeding Your Silkworms
Feeding your silkworms is one of the most enjoyable—and critical—parts of the process. Here are the essentials:
- Food Source: Silkworms primarily eat mulberry leaves. You can also use other leaves like osage orange or white mulberry, but make sure they are fresh. No wilted or dry leaves, please!
- Feeding Schedule: Young silkworms (first to second instar) need to be fed several times a day. As they grow, you can reduce feeding to once or twice daily.
- Amount: Start with small amounts. It’s better to underfeed than overfeed, as uneaten leaves can spoil and cause problems.
You might be wondering how you know if your silkworms are hungry. Keep an eye on their behavior. If they seem sluggish or stop eating, it’s time to check their food supply.
Caring for Silkworms: Health and Maintenance
Healthy silkworms are happy silkworms! Here are some tips for maintaining their health:
– Cleanliness: Regularly clean the habitat to prevent mold and bacteria. Remove any uneaten food and waste. A clean environment is crucial for their wellbeing.
– Observing Growth: As the larvae grow, successively larger food will be needed. Watch for signs of molting. When silkworms molt, they shed their skin to grow. During this period, they can be more sensitive, so handle them gently.
– Temperature and Humidity Checks: As mentioned, maintaining the right temperature and humidity is vital. Invest in a simple hygrometer to measure humidity accurately.
With proper care, your silkworms should thrive and grow, seemingly overnight!
Harvesting Silk: From Cocoon to Thread
Once your silkworms reach their final larval stage, they’ll start spinning their cocoons. This is the exciting part!
– Cocoon Collection: Once the cocoons are formed (after about 2-3 days), collect them gently. You can harvest them while they’re still fresh or wait until they dry.
– Extraction Process: To extract silk, you’ll typically boil the cocoons to kill the pupa inside, preventing them from becoming moths. After boiling, you can unravel the silk threads.
– Spinning Silk: Once you’ve gathered enough threads, you can spin them together. This requires a bit of practice, but it’s immensely gratifying.
Harvesting silk can be labor-intensive but incredibly rewarding when you see the beautiful end product.
Managing Common Issues When Breeding Silkworms
Like any project, breeding silkworms comes with its challenges. Here are some common issues and how to tackle them:
– Mold Growth: Mold can quickly become a problem in humid environments. If you see mold, remove affected areas immediately and ensure proper ventilation.
– Overcrowding: If your silkworms are packed too tightly, they can stress out and grow poorly. Make sure they have enough space to breathe and eat.
– Pests: Keep an eye out for pests like mites. If you spot any, take action quickly; cleaning and keeping the habitat dry can help manage this.
Staying vigilant and proactive will definitely make your breeding experience smoother.
Breeding silkworms can be a fulfilling endeavor, whether for their beauty, the silk they produce, or simply the joy of watching them grow. The process teaches patience, responsibility, and a little bit of biochemistry along the way. As you embark on this journey, remember to enjoy every stage—the eggs, the larvae, the cocoons, and finally, the silk.
So grab those mulberry leaves and get started! You might just find that a simple hobby can lead to a deeper appreciation for nature and the amazing life cycles around us. Happy breeding!