
You see, silkworms go through several molting stages as they grow, and monitoring these stages can tell you a lot about their well-being and readiness for the next phase of life. You might be wondering how to keep an eye on these changes. It’s actually pretty straightforward, and armed with the right knowledge, you can become a pro at spotting the signs. Let’s dive in together and explore the ins and outs of monitoring silkworm molting stages.
What is Molting in Silkworms?
Molting, or ecdysis, is a natural process where silkworms shed their exoskeletons to allow for growth. This happens several times throughout their life cycle, specifically during the larval stages. Honestly, it’s a bit like a snake shedding its skin. A silkworm can grow about five times its size during these stages, making molting a vital part of its development.
During the molting process, silkworms absorb moisture to help loosen their old skin. They then wriggle out of it, leaving a soft, new exoskeleton underneath. This new skin will harden over time, providing the necessary protection as they continue to grow. You might not see the actual process happening because it can take place quickly, often overnight. That’s why monitoring molting stages is essential if you’re raising silkworms!
The Stages of Silkworm Development
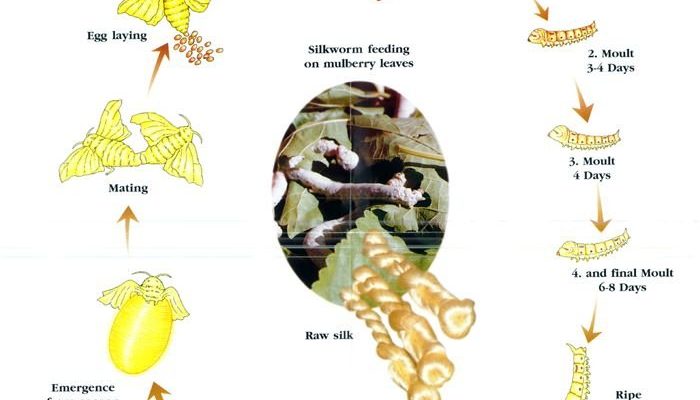
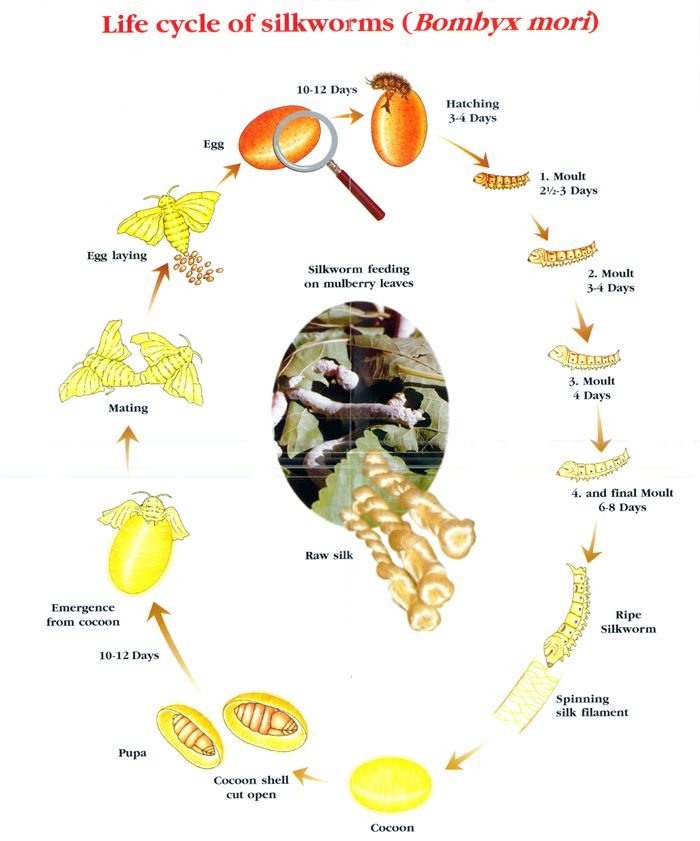
Silkworms undergo several development stages, known as instars. Generally, there are five larval stages before the silkworm enters the pupation phase. Each stage involves molting, which allows the silkworm to grow larger. Here’s a quick breakdown:
- **First Instar:** The tiny hatchlings emerge from their eggs and are incredibly small, measuring around 3 mm. They’re voracious eaters at this stage and begin munching on mulberry leaves right away.
- **Second Instar:** After about 24 hours, they will shed their first skin and grow to about 8mm. This is when you start to notice the changes in their size.
- **Third Instar:** In this stage, they reach around 20mm. They begin to eat more and will molt again after a few days.
- **Fourth Instar:** The silkworms can grow up to 40mm during this stage, and they start becoming more active and noticeable.
- **Fifth Instar:** This is the final larval stage before they pupate. They can reach up to 70mm, and during this time, they will eat a lot more to prepare for cocooning.
Understanding these stages is crucial. Monitoring them closely means you can ensure they’re growing well and appropriately adjusting their environment as needed.
How to Monitor Silkworm Molting Stages
Monitoring silkworm molting stages involves a few key practices. First, it’s important to maintain ideal conditions for your silkworms. They thrive best in a warm environment with plenty of fresh air and humidity. If the atmosphere is off, it could affect their ability to molt successfully.
Here are some effective ways to keep tabs on them:
1. **Visual Checks:** Regularly check on your silkworms. Look for changes in size and behavior. They may become less active right before they molt.
2. **Check the Skin:** After a molt, you’ll likely find the old skin in the rearing container. This is a clear sign that they’ve transitioned to the next stage.
3. **Observe Feeding Habits:** Notice how much they’re eating. An increase in appetite can mean they’re gearing up for another molt.
4. **Humidity Levels:** Silkworms need a humid environment to facilitate molting. Ensure you’re providing moisture, but avoid over-saturation which can lead to mold.
By implementing these monitoring practices, you’ll set your silkworms up for success and help them navigate their growth journey seamlessly.
Identifying Common Issues During Molting
Even with the best care, silkworms can encounter issues during molting. You might notice some signs that indicate they’re struggling. For instance, if a silkworm appears to be stuck in its old skin, this can lead to serious health problems.
Here are some common problems you might face:
– **Stuck Skin:** Sometimes, a silkworm may not shed all of its skin properly. If you see this, gently assist it by carefully removing the old skin with tweezers. Just be sure not to damage the new skin underneath.
– **Dehydration:** If the environment is too dry, silkworms may not be able to properly molt. Keep an eye on humidity levels and adjust as necessary.
– **Infection:** A molting failure can lead to infections. If you notice any discoloration or abnormalities in your silkworms’ bodies, it’s essential to address this quickly.
Being aware of these potential issues helps you react swiftly, improving the chances of a successful molt for your silkworms.
Why is Monitoring Important?
Monitoring silkworm molting stages isn’t just about observing a fascinating process; it’s crucial for the overall health and productivity of your silkworms. If you’re nurturing these creatures for silk production, the success of your venture relies heavily on ensuring they grow properly through each stage.
Here’s why monitoring matters:
1. **Health Indicators:** Regular observations can alert you to any health issues before they become severe. A healthy silkworm is more likely to produce quality silk.
2. **Optimal Conditions:** Understanding how often and when your silkworms are molting helps you create an optimal environment for growth.
3. **Successful Harvest:** If you’re raising silkworms for silk, monitoring ensures you don’t miss the ideal time for harvesting cocoons, which is a vital step in silk production.
By keeping a close eye on these stages, you’re not just being a caring pet owner; you’re engaging in a process that can lead to a rewarding outcome.
Tools and Techniques for Effective Monitoring
Now that you understand the importance of monitoring silkworm molting stages, let’s talk about some effective tools and techniques you can use. While you don’t need a ton of fancy equipment, having a few essentials can make the process smoother.
– **Thermometer and Hygrometer:** These tools help you keep track of temperature and humidity levels in your silkworm habitat. Aim for a temperature around 25-28°C (77-82°F) and humidity levels between 60-80%.
– **Magnifying Glass:** A handy tool for inspecting silkworms more closely, particularly when checking for stuck skin or other problems.
– **Notebook or App:** Documenting growth stages, feeding habits, and any issues can help you notice patterns over time. You might find that certain conditions lead to better molting success.
Remember, monitoring isn’t about being overly cautious—it’s about being attentive and caring. These tools will help you notice what’s normal and what’s not, allowing you to adjust conditions as needed and keep your silkworms thriving.
Monitoring silkworm molting stages is both a science and an art. It requires your attention and care, but the rewards can be fantastic. Whether you’re interested in sericulture or simply want to enjoy watching these remarkable creatures grow, understanding molting stages gives you a deeper appreciation for their lifecycle.
With the right knowledge, tools, and a little patience, you’ll become skilled at spotting changes and ensuring your silkworms thrive. So, grab a notebook, keep an eye on the humidity, and prepare to witness the wonder of nature unfold right before your eyes. Happy silkworm monitoring!