
Before we dive in, let’s be clear: starting a worm bin isn’t just about having a place to dump those old veggie peels. It’s about creating a mini-ecosystem where worms happily munch away, transforming waste into rich compost. This compost can then nourish your plants or garden, making it a win-win for you and the environment. Ready to roll up your sleeves? Let me explain how to get started!
Why Start a Worm Bin?
You might be wondering why you should bother with a worm bin in the first place. Besides the obvious environmental benefits, worm composting, also known as vermicomposting, offers several perks. First off, it’s an effective way to reduce the amount of kitchen waste you produce. Instead of tossing those apple cores and coffee grounds in the trash, you can feed them to your worms instead!
Moreover, worm compost is incredibly nutrient-dense. When worms break down your organic waste, they create castings that are packed with beneficial microbes and nutrients. Using this compost can greatly enhance your garden’s soil quality, leading to healthier plants and even better harvests. Isn’t it satisfying to know that you’re not only helping the planet but also boosting your gardening efforts?
Finally, it’s a relatively low-maintenance endeavor. Once you set up your worm bin correctly, these little creatures will do most of the work for you. You’ll just need to check in occasionally and make sure they’re happy.
Choosing the Right Worms
The worms you choose are the backbone of your worm bin. *Red wigglers* (Eisenia fetida) are the stars of the show here. They thrive in composting conditions and are voracious eaters. You can find them at local gardening stores, bait shops, or even online.
If you’re not sure how many to start with, aim for about 1 pound of worms. This will usually translate into around 1,000 worms, which is enough to get your bin going. Here’s the thing: these little guys are capable of consuming half their weight in food every day! That means if you have a pound of worms, they can munch through a half a pound of kitchen scraps daily.
A quick tip? Avoid using nightcrawlers (the ones typically used for fishing) in your bin. They prefer to burrow deep into the soil rather than munching on kitchen scraps. Stick with the red wigglers for success!
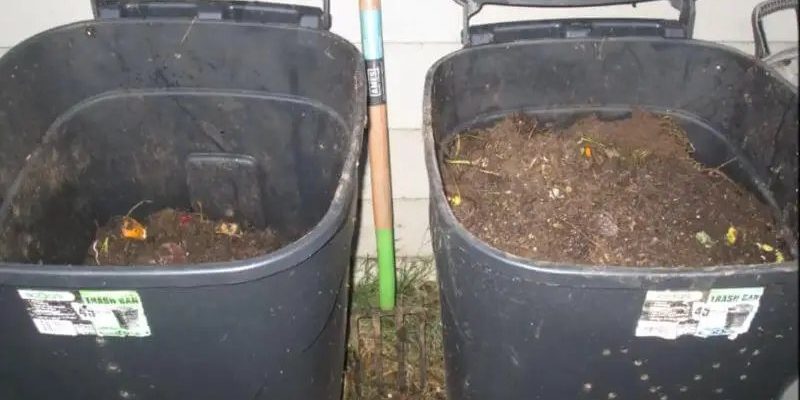
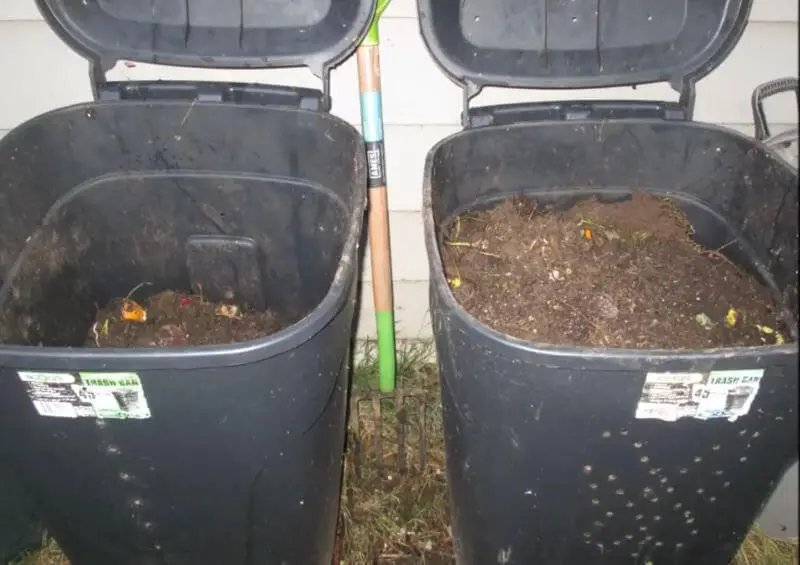
Setting Up the Worm Bin
Now comes the fun part: setting up your worm bin! You don’t need anything fancy, but you’ll need a few essentials.
1. **Container**: A plastic tote or a wooden bin works well. Aim for a size of about 10-20 gallons. Make sure it’s opaque; worms hate light!
2. **Bedding**: Your worms need a cozy home. Shredded newspaper, cardboard, coconut coir, or peat moss all work beautifully as bedding. Moisten it with water until it feels like a wrung-out sponge—this keeps your worms comfortable.
3. **Drainage**: Drill small holes in the bottom of your bin for drainage. Worms don’t like sitting in water, so this step is crucial.
4. **Lid**: Ensure the lid has ventilation holes. Your worms need some airflow, and a well-ventilated bin helps prevent odors.
Once you’ve gathered these supplies, it’s time to combine them. Fill the bin with your chosen bedding, add your red wigglers, and then sprinkle on some kitchen scraps. And just like that, you’ve set the stage for your new composting buddies!
Feeding Your Worms
Feeding your worms is pretty straightforward, but there are some key points to keep in mind. First, remember that worms are omnivores, meaning they eat both plant and animal matter. Here’s a quick list of what they love:
- Vegetable scraps (think carrot tops, potato peels)
- Fruit scraps (avoid citrus, as it can be too acidic)
- Coffee grounds and filters
- Eggshells (crushed, they add calcium)
On the flip side, you’ll want to steer clear of certain foods. Never feed them meat, dairy, or oily foods. These can create odors and attract pests, which is the last thing you want in your worm bin.
How much food should you give them? Start small. Add a handful of scraps at a time, and give your worms a chance to catch up. You can gradually increase the amount as you get a sense of how much they can handle.
Maintaining Your Worm Bin
Keeping your worm bin healthy and happy is easier than you might think! Here are some essential maintenance tips:
1. **Temperature**: Worms prefer a temperature range of 55-77°F (13-25°C). If your bin gets too hot or too cold, your worms may not thrive. Placing your bin in a shaded area or garage can help.
2. **Moisture**: Check the moisture level regularly. If your bin is too dry, your worms can’t process food properly. If it’s too wet, they could drown. You want it just right, like a well-wrung sponge.
3. **Aeration**: Stir the bedding occasionally to aerate the bin. This helps prevent odors and keeps the worms active.
4. **Harvesting Castings**: Every few months, you can harvest the compost your worms produced. This can be done by moving the contents to one side of the bin and adding fresh bedding and food to the other side. The worms will migrate to the fresh food, allowing you to scoop out the finished compost.
Common Problems and Solutions
Even with diligent care, you might face some hiccups. Here’s how to tackle the most common issues:
– **Odors**: If your bin smells bad, it’s usually a sign of overfeeding or excess moisture. Cut back on food and check the moisture levels.
– **Pests**: If you see fruit flies or other pests, it might be because food was left on top for too long. Keep the bin covered, and bury food scraps inside the bedding.
– **Worms Not Eating**: If your little friends seem sluggish or are not eating, check the temperature and moisture in the bin. They may be unhappy with the conditions.
Remember, every worm bin is a little different, and it might take some time to hit that sweet spot. But, with a bit of patience, you’ll get there!
Using Your Worm Compost
Once you’ve successfully harvested your worm castings, it’s time for the best part—using it!
You can mix worm compost into your garden soil to boost nutrient levels. It can also be used as a top dressing for potted plants. Just sprinkle a layer on top of the soil and let the worms do their thing.
Another popular method is to make “worm tea.” Simply steep your compost in water for a few days, strain it, and use the liquid as a nutrient-rich fertilizer for indoor and outdoor plants. Your greens will thrive, and you’ll get to feel like a gardening wizard!
Starting a worm bin for kitchen waste is a rewarding adventure. Not only are you reducing waste and nurturing the environment, but you’re also creating a rich resource for your garden. With just a little effort, your kitchen scraps can turn into black gold that your plants will love.
So grab some red wigglers, set up your bin, and watch as these little guys transform your waste into something amazing. It’s a simple step toward sustainability that anyone can take. Trust me, once you get started, you’ll wonder why you didn’t do it sooner!