
Picture this: you start with a handful of tiny eggs and, over time, watch them grow into charming little inchworms, then into beautiful moths. It’s a bit like nurturing a garden, but instead of flowers, you’re cultivating a tiny world full of curious little critters. Let’s dive into how you can raise inchworms successfully and what you need to know along the way.
Understanding Inchworms: The Basics
Before we get into the nitty-gritty of raising inchworms, it’s helpful to know what these critters are all about. Inchworms are the larvae of various moth species, primarily belonging to the Geometridae family. They get their name from their unique way of moving, which looks like they’re measuring the ground. These little guys usually come in small, pastel colors, making them a bit hard to spot in their natural habitat.
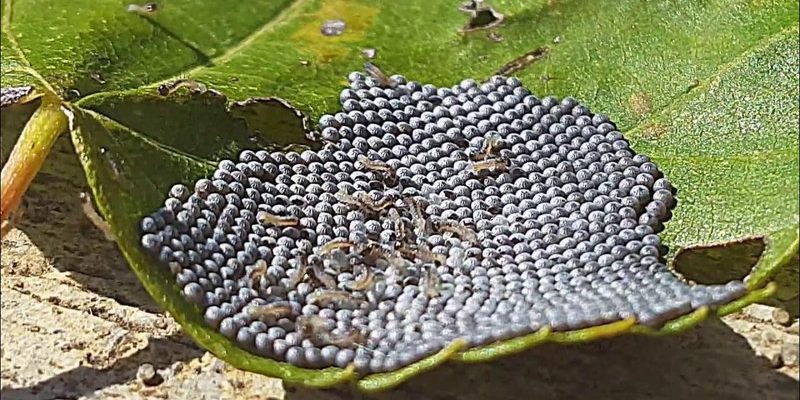
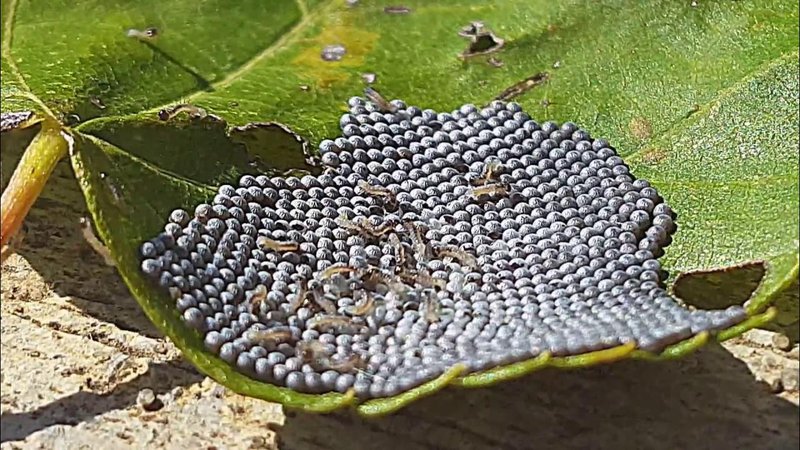
When you’re thinking about raising inchworms, you might wonder where to find their **eggs**. Well, many species lay their eggs on the leaves of host plants. Common host plants include oak, maple, and elm trees. If you’re lucky, you might find some eggs during a nature walk. Keep your eyes peeled for tiny clusters on leaves!
Gathering Materials for Inchworm Rearing
You can’t raise inchworms without the right materials, right? Here’s what you’ll need to create a cozy habitat for your soon-to-be inchworms:
- A Container: A clear plastic box or a glass jar will work well. The container should be well-ventilated to prevent moisture buildup.
- Substrate: A layer of damp paper towels or soil will provide a comfy base for the inchworms.
- Food: Fresh leaves from the host plants are crucial. Be sure to choose non-toxic varieties, as some plants can be harmful to them.
- A Spray Bottle: This will help you keep the environment humid. Inchworms thrive in a moist atmosphere.
Having all these materials handy will ease the process and ensure your inchworms have everything they need to grow. Think of this setup like preparing a cozy little nursery—everything needs to be just right for your tiny inhabitants to thrive.
Setting Up the Habitat
Now that you’ve gathered your materials, it’s time to set up the habitat! Let me explain how to do this in a few simple steps.
1. **Choose the Container**: Start with your clear plastic box or jar. Make sure it has holes for ventilation; otherwise, you might create a sauna effect, which can be harmful to your inchworms.
2. **Add the Substrate**: Layer the bottom with damp paper towels or garden soil. This will help maintain humidity levels, which is key for inchworm growth.
3. **Place Fresh Leaves**: Gather leaves from the host plants and place them in the container. Remove any chemicals or pesticides from the leaves to keep your inchworms safe.
4. **Mist the Environment**: Use your spray bottle to lightly mist the inside of the container. This will create a moist habitat, which inchworms love.
You’re all set! This little setup is where the magic happens. Just imagine those tiny eggs hatching into inchworms—it’s a delightful experience.
Feeding Your Inchworms
Feeding inchworms is relatively straightforward, but there are some important details to keep in mind. Here’s the thing: they are picky eaters. They only munch on certain leaves, so it’s crucial to provide the right kind of food.
1. **Choose Fresh Leaves**: Make sure the leaves are fresh and free from pesticides. You can find them on trees or purchase them from gardening stores.
2. **Monitor Food Intake**: Inchworms can eat quite a bit, especially as they grow. Replace old or wilting leaves every few days to keep their diet fresh.
3. **Observe Their Preferences**: You might find that your inchworms prefer one type of leaf over another. It’s all a part of getting to know your little buddies!
As you watch them munch away, you might be amazed at how quickly they grow. Inchworms can double in size within a week, so keep your eyes peeled!
Monitoring Growth and Development
As your inchworms start growing, you’ll want to monitor their progress. They go through several stages called instars before finally becoming moths. Here’s how to recognize these stages:
1. **First Instar**: After hatching, they’re only about a half-inch long. They move slowly and are quite delicate at this stage.
2. **Subsequent Instars**: With each instar, they increase in size and may change color. This is the time to pay close attention, as their needs will evolve.
3. **Pre-Pupal Stage**: Eventually, they’ll stop eating and seek out a cozy spot to spin their cocoon. This is when the excitement builds—your inchworms are about to transform!
Monitoring their growth is key to understanding their needs. You might find yourself smiling as you witness their metamorphosis, and that’s a rewarding part of the experience.
Dealing with Common Issues
While raising inchworms can be an enjoyable journey, it’s not without its challenges. Here are some common issues you might face and how to handle them:
1. **Mold Growth**: If the habitat is too humid, you may notice mold forming. To combat this, keep the environment well-ventilated and reduce moisture. Removing old food can help as well.
2. **Poor Growth**: If your inchworms aren’t growing, check if they’re getting enough food and moisture. They need a healthy diet and a humid environment to thrive.
3. **Pest Issues**: Occasionally, pests may invade your inchworm habitat. If you spot any unwanted guests, remove them carefully without harming the inchworms.
Being proactive helps prevent issues, but remember, it’s all about learning together. You’re on this journey with your inchworms, and that’s part of the fun!
Transforming Into Moths
The moment you’ve been waiting for is finally here! After several weeks of care, your inchworms will enter the pupal stage and form cocoons. This is a fascinating time where they’ll undergo complete metamorphosis. Here’s what to expect:
1. **Cocoon Formation**: Your inchworms will find a safe place in the habitat to spin their cocoons. This can take a few days, so be patient. They’ll look like small silk pods.
2. **Pupal Stage**: Inside the cocoons, they are changing. This stage can last several weeks. Keep the habitat clean and maintain humidity during this period.
3. **Emergence**: Once ready, they’ll break free from their cocoons as adult moths. It’s a magnificent transformation that feels a bit like watching magic unfold right before your eyes.
At this point, you can choose to release them into the wild or keep them in a separate habitat for observation. Either way, you’ve seen a full life cycle in action!
Raising inchworms from eggs to adults is not just a project; it’s an experience filled with lessons, joy, and wonder. You’ve learned how to set up their environment, provide food, monitor growth, and even tackle common issues. It’s like being a tiny caretaker for these fascinating little creatures.
As you embark on this journey, remember to enjoy every moment, embrace the learning process, and appreciate the beauty of nature’s life cycles. So, whether you’re doing this with kids or just for your own curiosity, you’re bound to create some memorable moments along the way. Happy inchworm raising!