
Let me explain how quarantining live rock works. Think of it like introducing a new pet to your home. You wouldn’t want to toss a new puppy into a room full of cats without making sure everything is safe and sound, right? Similarly, when you bring home live rock, you need to give it some time to acclimate away from your main tank. This article will walk you through the steps to effectively quarantine live rock and help you avoid the hassle of a potential Bobbit worm infestation.
What Are Bobbit Worms Anyway?
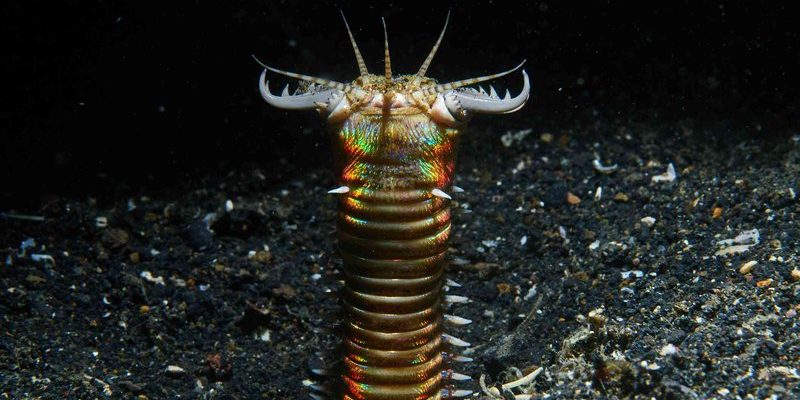
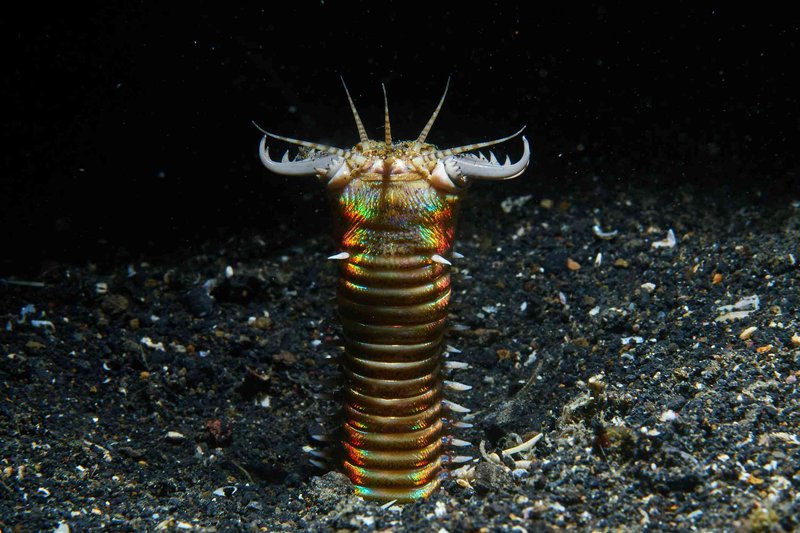
Bobbit worms, or *Eunice aphroditois*, are fascinating yet fearsome creatures. These marine worms can grow quite large, sometimes reaching lengths of up to 10 feet. However, you’ll mostly encounter smaller ones in home aquariums. These worms hide in the substrate or within live rock, waiting patiently for unsuspecting prey to swim by.
What makes Bobbit worms particularly infamous is their impressive hunting technique. They extend out of their burrows, rapidly snatching fish or invertebrates with their sharp jaws. If you’ve ever seen a scene in a movie where the villain strikes from the shadows, that’s what a Bobbit worm does—but in real life, and with a twist! You might not notice them until it’s too late, which is why understanding how to quarantine live rock is crucial.
Why Quarantine Live Rock? The Importance Explained
You might be wondering why quarantining live rock is necessary at all. Well, besides the obvious threat of Bobbit worms, live rock can also carry other pests and diseases. Algae blooms, parasites, and unwanted invertebrates can hitch a ride on the rock, potentially wreaking havoc in your aquarium.
When you quarantine your live rock, you’re giving it a chance to be “cleaned up” before it joins your main display. This process can save you time, money, and stress down the line. The last thing you want is to introduce unwanted species that either compete for resources or harm your beautiful fish. Picture it like a bouncer checking IDs at a club—keeping the riffraff out ensures a good time for everyone.
Gathering Your Quarantine Supplies
To get started with quarantining your live rock, you’ll need a few basic supplies. Think of it as setting up a temporary home for your live rock. Here’s a quick list of what you’ll need:
- Container or tank: Pick a tank that’s large enough to hold your live rock and has good water circulation. A 20-gallon tank can work well for most setups.
- Water: Use saltwater, ideally mixed from a high-quality marine salt mix. Ensure it’s properly aerated and heated to match your main tank’s parameters.
- Heater: To maintain warm water temperatures, set your heater to about 75-80°F.
- Powerhead: A powerhead will help circulate the water, aiding in oxygenation and keeping debris suspended.
- Light source: You don’t need anything fancy, but some light will help keep any beneficial algae growing on the rock.
Collecting these supplies is the first step in your quarantine journey. It’s important to create a comfortable environment for your live rock.
How to Properly Quarantine Live Rock
Now that you have everything set up, let’s dive into how to quarantine your live rock effectively.
1. **Set up your quarantine tank:** Start by filling your tank with the pre-mixed saltwater and installing the heater and powerhead. Let the equipment run for a few hours to stabilize the environment.
2. **Introduce the live rock:** Carefully place the live rock into your quarantine tank. Ensure it’s fully submerged, and give it a little space for water to flow around each piece.
3. **Monitor water parameters:** Over the next few days, regularly check the ammonia, nitrite, and nitrate levels. You want ammonia and nitrites to be at zero, and nitrates to be as low as possible.
4. **Observe for pests:** Keep a close eye on your live rock for a week or two. Look for any signs of Bobbit worms or other unwanted inhabitants. You can even use a flashlight at night to spot any lurking creatures that might not be visible during the day.
Signs of Bobbit Worms: What to Look For
Keep your detective hat on while you monitor your live rock, because Bobbit worms are sneaky! Here are some signs to look for:
– **Small holes or tunnels:** If you notice small holes in the rock or substrate, it could be a sign of a Bobbit worm burrowing inside.
– **Tentacle-like appendages:** At night, you might see thin, worm-like appendages reaching out from the rock. If it looks like a finger waving at you, you might have a Bobbit worm on your hands.
– **Prey disappearance:** If small fish or invertebrates seem to go missing mysteriously, it’s worth investigating your live rock for hidden invaders.
It’s always better to err on the side of caution. If you suspect the presence of Bobbit worms, consider removing the rock and inspecting it closely.
What to Do If You Spot a Bobbit Worm
If you do spot a Bobbit worm, don’t panic! Here’s how to handle it:
1. **Remove the rock:** Carefully take the affected live rock out of the quarantine tank.
2. **Inspect the rock:** Look for the worm itself and try to extract it. You can use tweezers or even a small fishing net if it’s still partially visible.
3. **Dispose of the worm:** It’s best to humanely dispose of the worm if you can catch it. You don’t want it causing trouble in your aquarium.
4. **Continue the quarantine:** If you didn’t find any worms, you can continue with the quarantine process, but keep a watchful eye just in case.
You might feel a bit squeamish about dealing with the worm, but remember that you’re protecting your aquarium and its inhabitants.
After Quarantine: Preparing for Your Main Tank
Once your live rock has successfully passed through quarantine, it’s time to introduce it to your main tank. Here’s how to do it smoothly:
1. **Flush the rock:** Before moving it, rinse the live rock in fresh saltwater. This will help remove any loose debris or pests that may have escaped detection.
2. **Acclimate the rock:** Slowly acclimate the live rock to the water conditions in your main tank. You can do this by floating it in a bag with some water from your tank for about 30 minutes. Gradually mix tank water into the bag over the next hour.
3. **Place the rock:** Finally, add your live rock to your aquarium. Arrange it in a way that promotes good water flow and provides hiding spots for your fish.
Congratulations! You’ve just taken a big step toward creating a thriving marine environment.
Final Thoughts on Quarantining Live Rock
Quarantining live rock may seem like a hassle, but it’s an essential part of maintaining a healthy aquarium. By taking a little extra time to check for Bobbit worms and other potential invaders, you’re protecting your investment and ensuring the wellbeing of your aquatic friends.
Honestly, preventing problems is always easier than dealing with them later. With these simple steps in your back pocket, you can confidently set up your saltwater aquarium and enjoy all the beauty it brings without the worry of hidden pests. Happy fishkeeping!