

Creating a suitable habitat isn’t just about putting some dirt and plants in a box. It’s about understanding what inchworms need to thrive, which can spark curiosity and discussion in your project. So, if you’re ready to dive into the world of inchworms and discover how to create the perfect home for them, let’s get started!
Understanding Inchworms: What You Need to Know
You might be wondering, what exactly is an inchworm? Inchworms are actually the larvae of certain moths, mainly from the Geometridae family. They’re called inchworms because of the way they move: they appear to “measure” the ground with their movements, inching along by pulling their back end up. Understanding their life cycle and behavior is essential for your project habitat.
These little guys have specific needs when it comes to their environment. They prefer dark, moist, and sheltered areas, which means your habitat should ideally resemble their natural forest floor. In their natural habitat, inchworms munch on leaves and twigs, so it’s essential to include these elements in your habitat.
The beauty of studying inchworms is in observing their transformation. They undergo a complete metamorphosis, turning into moths. By constructing a habitat, you’re not just creating a home; you’re setting up a front row seat to nature’s magic!
Gathering Materials for Your Habitat
Now that you know more about inchworms, it’s time to gather your materials. Here’s a simple list to get you started:
- Glass or plastic terrarium or container
- Potting soil or organic compost
- Fresh leaves or small twigs
- Spray bottle for misting
- Small rocks or gravel (for drainage)
- Optional: small branches or pinecones for decoration
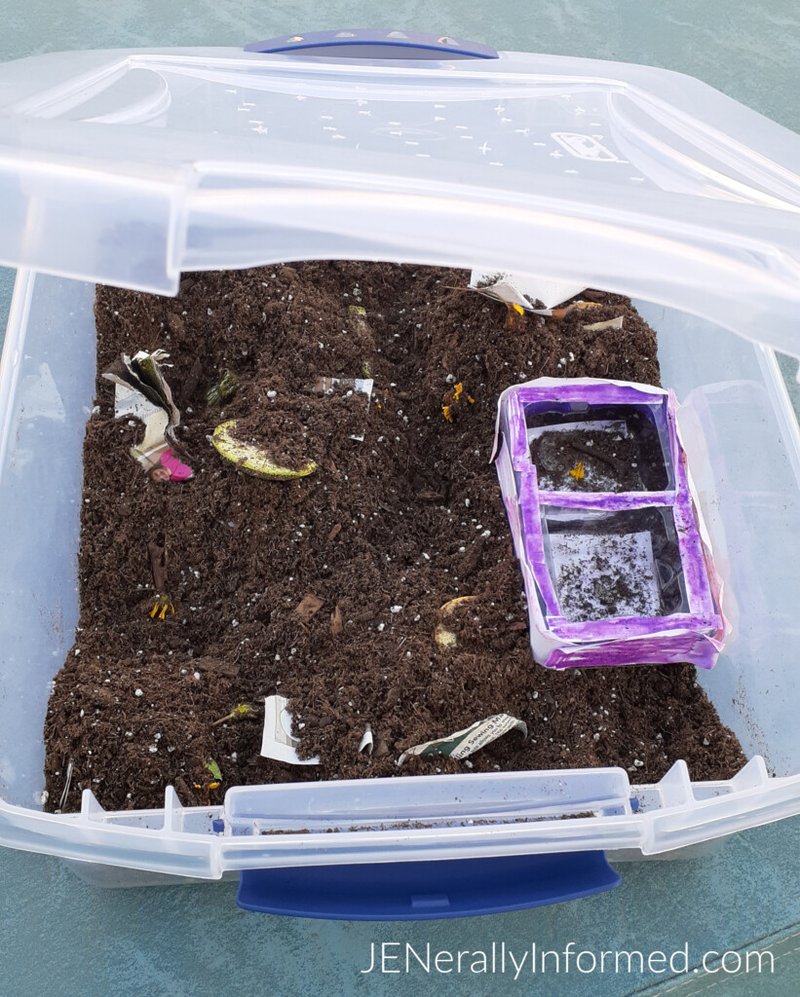
Choosing the right container is important. You don’t want it too big, but it should have enough space for the inchworms to move around and explore. A terrarium, which mimics a natural ecosystem, is a perfect choice!
Besides just leaves, consider including some small twigs or branches, as inchworms like to hide and maneuver around them. They also appreciate a little moisture, so you can use a spray bottle to keep the habitat moist without making it soggy.
Building the Habitat Step by Step
Ready to build? Let’s break it down into simple steps:
Step 1: Prepare the Container
Start by cleaning your container. Rinse it with warm water to remove any old residues. Once it’s clean and dry, you’re ready to move on.
Step 2: Create a Drainage Layer
Add a thin layer of small rocks or gravel at the bottom. This helps with drainage, ensuring that excess water doesn’t drown your inchworms. It’s like giving them a comfy bed while keeping their home cozy!
Step 3: Add Soil
Next, layer in your potting soil or compost. Aim for about 2–3 inches deep, which is enough for inchworms to dig and burrow. Pack it down gently to create a firm yet soft surface.
Step 4: Populate with Plants
It’s time to make the habitat feel alive! Add some fresh leaves or small plants to provide food and hiding spots. You can mix in different types of leaves; inchworms love to munch on those from trees like oak, maple, and even fruit trees.
Introducing the Inchworms
After setting up their new habitat, it’s time to introduce your inchworms. Gently place them in their new home, and let them explore. They might seem shy at first, but give them time to acclimate. You can place a few leaves on the soil surface for them to munch on.
Make sure to observe their behavior. You’ll notice how they interact with their environment—climbing, hiding, and munching away. This is where the real magic happens, as you get to witness their daily activities!
Maintaining the Habitat
Keeping your inchworm habitat healthy is vital for their growth and well-being. Here are some tips for maintenance:
- Moisture: Use a spray bottle to lightly mist the habitat every couple of days, ensuring the soil stays moist but not soggy.
- Food: Regularly refresh the leaves and twigs. It’s like keeping a grocery list for your inchworms; they need good, fresh food!
- Cleanliness: Remove any uneaten leaves or waste to prevent mold and keep the environment clean and safe.
- Observation: Keep an eye on the inchworms. If they look lethargic or unwell, adjust their environment as needed.
As you care for them, you’ll learn more about their habits and perhaps even witness the glorious moment when they transform into moths!
Documenting Your Findings
One of the best parts of your inchworm project is sharing your findings. Consider keeping a journal or a scrapbook where you record your observations. Take notes on their behavior, growth stages, and anything interesting you notice.
You might even want to include photos or drawings. This can be a fantastic way to engage classmates or family members in your project. You could also prepare a presentation where you share not just your habitat setup but also fun facts about inchworms.
Wrapping Up Your Habitat Adventure
Building a habitat for your inchworm study project offers a unique chance to connect with nature right from your home or classroom. Not only do you get to create a thriving ecosystem, but you also learn firsthand about these fascinating creatures and their roles in the environment.
Remember, it’s all about being patient and observant. Nature has so much to teach us, and every inchworm you study provides a little insight into the wonders of life. So grab your supplies and start building—your tiny wildlife adventure awaits!