
So, why earthworms? These creatures are nature’s little compost factories, munching through organic matter and transforming it into something special. Think of them as tiny gardeners that work silently in your backyard, turning waste into gold for your plants. In this article, we’ll dive into the fascinating world of earthworms and discover how they play a crucial role in the process of vermicomposting.
What is Vermicomposting?
Vermicomposting is the process of using earthworms to break down organic waste into compost. This isn’t just any compost; it’s rich in nutrients and beneficial microbes that help plants grow. Basically, it’s like giving your garden a high-quality superfood!
When you start vermicomposting, you create a comfortable environment for worms to thrive. This usually means a bin with the right amount of moisture, bedding material, and, of course, food scraps. The worms eat the scraps and produce castings—worm poop—which is packed full of nutrients. So, in a way, every time you feed your worms, you’re preparing a wonderful treat for your garden.
You might be wondering if vermicomposting is complicated or requires a lot of space. Let’s put it this way: if you can find room for a couple of bins, you’re golden! You don’t need to have a big garden; even apartment dwellers can enjoy the benefits of vermicomposting.
Types of Earthworms for Vermicomposting
Not all earthworms are created equal when it comes to composting. The two main types you want to focus on for vermicomposting are *red wigglers* (Eisenia fetida) and *European nightcrawlers* (Eisenia hortensis). Each has its unique traits that make them suitable for this task.
Red wigglers are probably the most famous vermicomposters. These little guys thrive in compost piles and feed on decaying organic matter. They’re champs at converting waste into worm castings, making them the go-to choice for many composters.
On the other hand, you have the European nightcrawlers, which are a bit larger and prefer a cooler environment. These worms are versatile and can eat a wider variety of organic materials compared to red wigglers. However, they may take a bit longer to process the waste, so keep that in mind.
If you’re starting out, I recommend going with red wigglers since they’re easier to manage and more common in vermicomposting systems.
Setting Up Your Vermicomposting System
Ready to get started? Setting up your vermicomposting system is pretty straightforward. Here’s how to do it step by step:
1. **Choose a Worm Bin**: You can buy one or make your own from plastic storage containers or wooden boxes. Just make sure it has good drainage holes.
2. **Add Bedding**: Create a cozy home for your worms using shredded newspaper, cardboard, or coconut coir. This bedding should be damp but not soaking wet—think of a wrung-out sponge.
3. **Add Worms**: Once your bed is ready, it’s time to introduce your worms to their new home. A good starting amount is about a pound of worms, which can handle about half a pound of food scraps per day.
4. **Feed Your Worms**: Start by adding small amounts of kitchen scraps like fruit and vegetable peels, coffee grounds, and crushed eggshells. Avoid meat, dairy, and oily foods, as these can attract pests.
5. **Monitor Conditions**: Keep an eye on your bin! It should smell earthy, not foul. If it gets too wet, add more dry bedding; if it’s too dry, give it a light spray of water.
Honestly, once you set it up, it’s a bit like having a pet that you don’t have to walk! Just check in periodically and keep feeding them, and they’ll do all the hard work.
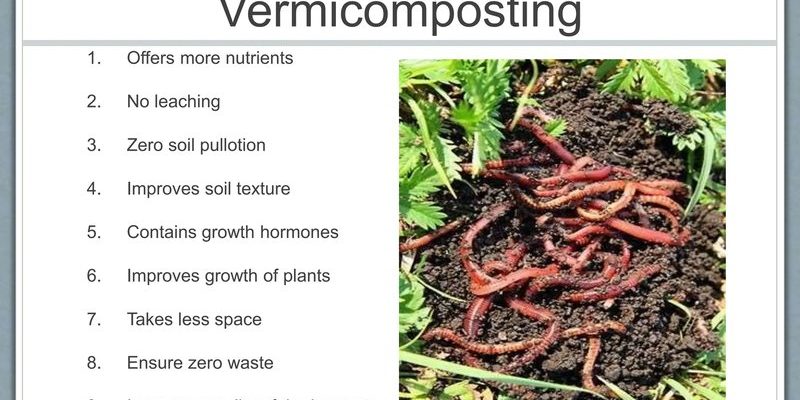
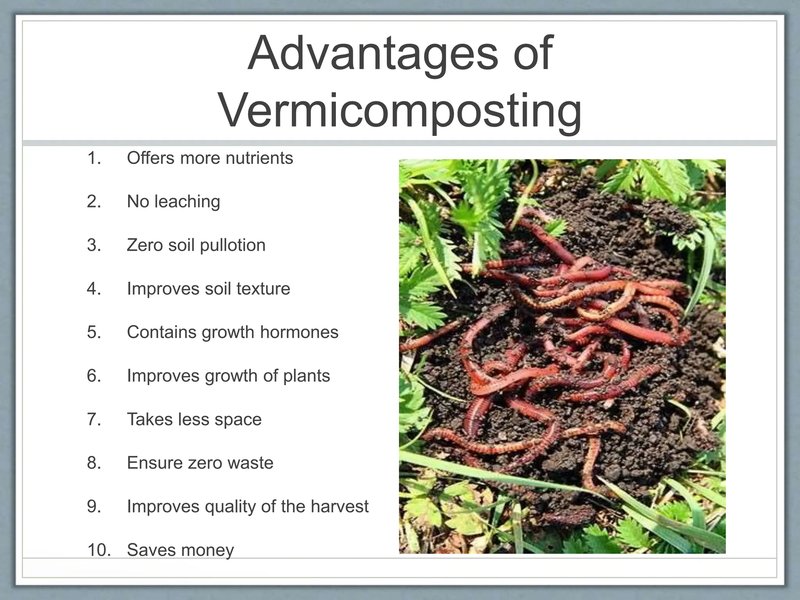
Benefits of Vermicomposting
So, why should you even bother with vermicomposting? For starters, it offers a treasure trove of benefits:
– **Reduces Waste**: Instead of tossing food scraps into the trash, you’re recycling them into something useful. This not only lessens landfill waste but also helps reduce greenhouse gas emissions from decomposing waste in landfills.
– **Nutrient-Rich Compost**: The castings produced by the worms are an incredible fertilizer that boosts soil health. They improve water retention, enhance drainage, and promote beneficial bacteria in the soil.
– **Eco-Friendly**: Vermicomposting is a sustainable practice that can be done at home. You’re employing nature’s solution to waste management, all while contributing to a healthier planet.
– **Better Soil Health**: Using compost made from worm castings can enhance your garden’s health, leading to better crops and healthier plants. Think of it as a natural boost for your garden.
Feeling inspired yet? The benefits are pretty compelling!
Common Issues in Vermicomposting
Even though vermicomposting is quite forgiving, you might run into a few hiccups along the way. Here are some common issues and how to tackle them:
– **Overfeeding**: If you add too much food too quickly, your worms can become overwhelmed. This can lead to a smelly bin as uneaten food rots. Stick to small amounts at first and gradually increase.
– **Pests**: Fruit flies and other pests can sometimes invade your worm bin. To avoid this, make sure your bin is sealed and keep it clean. Covering food scraps with bedding can also help deter unwanted visitors.
– **Too Wet or Dry**: A soggy bin can suffocate your worms, while a dry one won’t provide enough moisture. If it’s too wet, add dry bedding; if it’s too dry, lightly mist it with water. A good rule of thumb is to aim for the consistency of a damp sponge.
Addressing these common challenges head-on will help you maintain a healthy and thriving vermicomposting system.
Using Vermicompost in Your Garden
Once you start collecting worm castings, you might be wondering how to use them in your garden. Here’s how to make the most of your vermicompost:
– **Top Dressing**: Sprinkle a layer of worm castings on top of your garden bed or potted plants. This provides nutrients and enhances soil structure.
– **Soil Amendment**: Mix worm castings into your soil before planting. This boosts nutrient levels and helps plants establish themselves better.
– **Seed Starter Mix**: Combine vermicompost with potting soil to create a nutrient-rich seed starter mix. This gives your seedlings a great kick-start.
– **Liquid Fertilizer**: You can also make a “worm tea” by soaking worm castings in water. This liquid can be used to water your plants, giving them a quick nutrient boost.
By incorporating vermicompost into your gardening routine, you’re creating a sustainable cycle that benefits both your plants and the environment.
Vermicomposting is more than just a trend; it’s a simple yet powerful way to support both your garden and the planet. By inviting earthworms into your home and allowing them to turn your kitchen scraps into rich compost, you’re participating in a sustainable practice that reaps benefits for years to come.
So, whether you’re a seasoned gardener or just starting out, consider giving vermicomposting a try. With a little patience and care, you’ll be amazed at what these tiny creatures can accomplish. Plus, it’s a rewarding experience to watch your waste transform into something so beneficial. Let’s get wriggling!