
Before we dive deep, let’s talk about the tools you’ll need. One of the simplest ways to start is by using a smartphone with a built-in time-lapse feature. Brands like **Apple** and **Samsung** have easy-to-use settings that will let you get started right away. You don’t need fancy equipment or a degree in film—just a little patience and a willingness to experiment.
What is Time-Lapse Photography?
Time-lapse photography is a technique that captures a scene at set intervals, then plays it back at a faster speed. Imagine taking a picture every minute for an hour and then watching it all in just a few seconds. This creates a thrilling effect, turning slow movements into something dynamic and engaging.
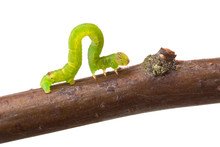
Inchworms, with their unique, slow-moving ways, are perfect subjects for this type of photography. Their movement isn’t just about getting from point A to B; it’s a delicate ballet, which can be mesmerizing when sped up.
Why Choose Inchworms?
You might be wondering, why focus on inchworms specifically? Well, they have some advantages that make them excellent for time-lapse videos:
- Unique Movement: Inchworms have a distinct way of moving by contracting and stretching their bodies, which looks interesting when played fast.
- Small Size: Their size makes them easy to observe without needing a ton of space.
- Accessibility: You can find them in gardens, forests, or even parks—making them easy to film.
Filming inchworms can be a fun project for anyone from a budding filmmaker to a curious nature lover. Plus, it gives you a chance to appreciate the small wonders of the natural world!
Setting Up Your Time-Lapse
Now that you’re excited about creating your time-lapse, let’s talk about setting it up. Here’s how you can get started:
1. Choose Your Location
When selecting a spot, look for areas where inchworms are likely to hang out—like the underside of leaves or the trunks of trees. You want a location where they’re active but not easily disturbed. Avoid windy areas, as this can shake your camera and ruin the video.
2. Position Your Camera
Once you’ve found the perfect spot, it’s time to set up your camera or smartphone. Make sure it’s stable—using a tripod can help immensely. Point the camera at the inchworm but leave enough space in the frame for its movement. This way, you won’t miss any of the action!
3. Set Your Time-Lapse Interval
If your device allows it, you can adjust the interval between shots. For inchworms, a 5-10 second interval works well, as it captures their slow movement without missing too much action. You might need to fiddle with these settings, so don’t hesitate to experiment!
Recording the Action
Once everything is set up, it’s time to hit record! Here are a few tips to keep in mind while filming:
1. **Patience is Key:** Inchworms don’t rush! Be prepared to wait for your subject to move. Sometimes they might stay still for a while, so enjoy the moment.
2. **Avoid Disturbances:** Try not to shake the camera or bump into it while filming. Even slight movements can disrupt the time-lapse effect.
3. **Monitor Lighting:** Good lighting can make a huge difference in the quality of your video. Overcast days can create soft, even light, while direct sunlight can create harsh shadows.
Editing Your Time-Lapse Video
After capturing all that inchworm action, it’s time for editing! Depending on what device you used, there are plenty of apps and software available, like iMovie, Adobe Premiere Pro, or even phone apps like InShot. Here’s a simple way to get started:
1. **Import Your Clips:** Bring all your video clips into the editing software.
2. **Adjust Speed:** You can speed up the clips if you feel the action is still too slow. Normally, a 30x speed increase can make even the tiniest movements look captivating.
3. **Add Music or Sound:** Background music or natural sounds can enhance the viewing experience. Just make sure it doesn’t overpower the visual aspects.
4. **Save and Share:** Once you’re satisfied with your masterpiece, save it in a high-resolution format. Now, you can share your time-lapse on social media or keep it as a beautiful memory.
Troubleshooting Common Issues
Not everything will go perfectly on your first try, but that’s okay! Here are some common problems you might encounter and how to fix them:
Low Quality Videos
If your video looks grainy, check your camera settings. Make sure you’re filming in the highest resolution possible. Also, ensure that your lens is clean; even a little smudge can affect clarity.
Inchworms Not Moving
Sometimes inchworms can be lazy or just not showing up at all. Be patient and allow some time. You can explore different locations or even try filming during different times of the day.
Too Little Footage
If you think you didn’t capture enough action, consider filming for a longer duration. You might need to let your camera run for a few hours to get enough footage for an exciting time-lapse.
Creating a time-lapse of inchworm activity can be a delightful project full of surprises. It invites you to take a closer look at the little wonders that often go unnoticed in nature. With just a few simple tools and a dash of creativity, you can create something beautiful and share it with the world.
So grab your camera, head out into nature, and let those tiny inchworms inspire you! Who knows, you might discover your next favorite hobby while capturing the slow but mesmerizing dance of these wonderful little creatures.