
So, let’s break it down. Think of silkworm eggs like any other precious item you want to handle with care. You wouldn’t just throw your favorite seeds into a drawer, hoping they’ll grow someday. Instead, you’d take the time to find the right environment. With silkworm eggs, it’s no different. Knowing their specific storage and incubation needs will help ensure a thriving life cycle, leading to the production of silky threads that have captivated humans for centuries.
In this article, we’ll explore everything you need to know about storing and incubating **silkworm eggs**. From the best conditions to nurturing them through the hatching process, I’ll guide you through the steps in a way that feels straightforward and manageable.
Understanding Silkworm Eggs
Before jumping into how to store and incubate silkworm eggs, let’s take a moment to understand what they are. Silkworm eggs come from the Bombyx mori moth, and they’re incredibly tiny—about the size of a pinhead. These eggs can be quite delicate, needing careful handling. When you first receive them, they’ll often come in a small container. This is a good start, but remember that how you treat those eggs will set the tone for your silkworm farming adventure.
You might be wondering what these eggs look like. They’re usually a pale color, almost like tiny pearls, and they can be somewhat sticky. If you squeeze them or mishandle them, you could damage them, which would hurt your chances of hatching silkworms. So, think of them as precious little treasures—they deserve some TLC!
Optimal Storage Conditions for Silkworm Eggs
Let’s get into storage! The first step in ensuring successful incubation is to store your silkworm eggs in the right environment. The ideal conditions mimic a cool, dry place, similar to a pantry or basement. You’ll want to keep the temperature between **18-22°C (64-72°F)**. A stable temperature is crucial; fluctuations can harm the eggs.
Humidity is another factor to consider. Silkworm eggs do best in a low-humidity environment, around **60%**. Too much humidity can lead to mold growth and spoil the eggs before they even get a chance to hatch. To achieve this, you might use a simple hygrometer, which measures humidity levels, or place a small package of silica gel in the storage area to help absorb moisture.
Also, it’s best to store the eggs away from light. Think of it like keeping a delicate dessert in a darkened cupboard; light can degrade them over time. You can wrap the egg container in a dark cloth or store it in an opaque box to minimize exposure.
Preparing for Incubation
Now that your eggs are stored safely, you might be eager to start the incubation process. Before that, preparation is key. When you’re ready, find a good incubation setup. A **silkworm incubator** is ideal, but you can create an effective environment with household items as well.
To start, take a shallow container and line it with soft tissue paper. This will serve as a soft bed for your eggs. Make sure the container has a lid that allows for some ventilation. You don’t want the air to be too stagnant, as this can harm the eggs.
You’ll also need to establish a temperature between **25-30°C (77-86°F)** for optimal hatching. This can be achieved with a simple heating pad set on low or by placing the container in a warm spot in your home. Just be careful not to overheat them—nobody likes an overly toasty environment!
Incubating Silkworm Eggs
Once your setup is ready, it’s showtime! Place the eggs in the prepared container and close the lid gently. The next couple of weeks will be crucial, as this is when the magic happens. During this time, you might be asking yourself, “How long until they hatch?” Typically, silkworm eggs take about **10-14 days** to hatch, depending on the temperature.
While incubating, it’s important to check on your eggs regularly. You want to make sure the temperature remains stable and that moisture levels aren’t too high. If you notice the humidity rising, you can leave the lid slightly ajar for a bit, allowing fresh air in without exposing them to too much light.
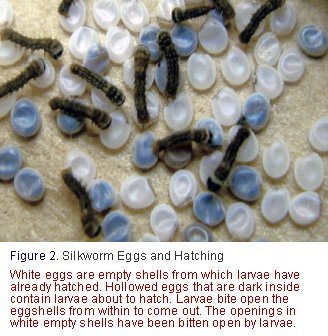
You might also see some tiny dark spots start to appear. These are the developing silkworms inside the eggs, which is quite an exciting sign that things are going well!
Common Issues During Incubation
Even with the best preparations, you might run into some common problems. One potential issue is mold growth, which can happen if the humidity is too high. If you spot any fuzzy, discolored patches on the eggs, it’s best to remove them immediately. This can prevent it from spreading to healthy eggs.
Another concern is the temperature. If it gets too cold or too hot, the eggs may fail to hatch. If you notice any drastic changes, take action quickly. You might need to move your setup to a different room or adjust the heating pad accordingly.
Finally, don’t be discouraged if not all eggs hatch. It’s natural for some to be non-viable. Silkworm farming, like any other nurturing endeavor, comes with ups and downs.
After Hatching: Caring for Young Silkworms
Congratulations—you’ve successfully hatched your silkworms! Now the real fun begins. Once the tiny worms emerge, they’ll be hungry and looking for their first meal. **Fresh mulberry leaves** are the best food for them at this stage. Make sure to provide them regularly, so they don’t go hungry!
You’ll also need to keep their environment clean. As the silkworms grow, they’ll shed their skin multiple times, which means you’ll want to remove any leftover food and waste regularly to maintain a healthy environment.
As they continue to grow, you might notice the small worms turning into larger caterpillars. This is a good sign that they’re thriving! Adjust their container as needed to give them enough space to grow.
Storing and incubating **silkworm eggs** might sound a bit daunting at first, but with the right approach, it can be a rewarding experience. By ensuring proper storage conditions, preparing for incubation, and addressing potential problems, you’ll set yourself up for success.
Remember, patience is key! Just like gardening, nurturing silkworms takes time and care. Celebrate each step, be it hatching or watching them grow. Before you know it, you’ll have your own silk-producing caterpillars, ready to spin those famous threads that have fascinated people for centuries. Good luck, and enjoy this beautiful journey into the world of silkworms!