
Now, you might be wondering what live rock dipping is. It’s basically like giving your new rock a good bath before letting it settle into your aquarium. This process not only cleans off unwanted critters but also helps keep your aquarium ecosystem in balance. A popular method is using a sea salt dip or specialized coral dips, which are effective in ridding live rock of these wriggly nuisances. So, grab your dipping bucket, and let’s get into how to do this right!
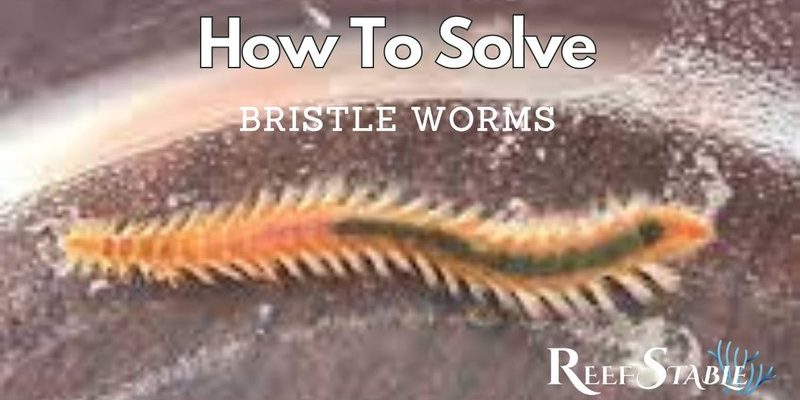
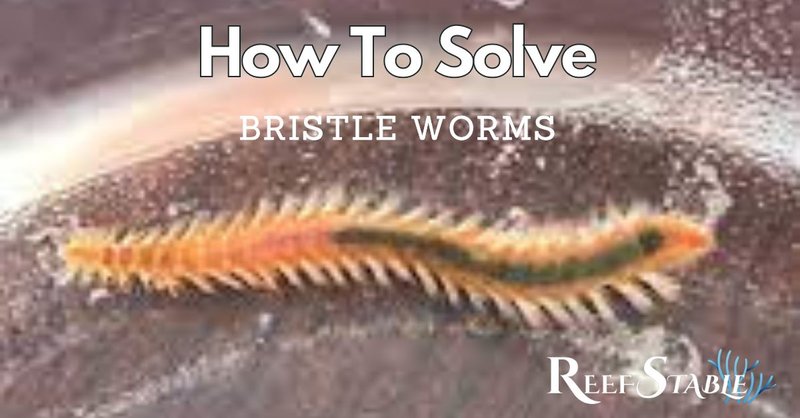
What Are Bristle Worms?
Bristle worms are a type of segmented worm that can be found in saltwater environments. You can spot them easily due to their long, slender bodies, ranging from a few inches to over a foot in length. They usually have a bristly appearance due to the tiny hairs or bristles that line their bodies. While they play a role in breaking down waste in a tank, they can quickly become a problem if their population grows unchecked.
So, why do they matter? Well, in small numbers, bristle worms can be beneficial for your tank. But in large numbers, they can outcompete other beneficial organisms for food and space. Plus, if you disturb them, they can also cause irritation with their bristles. This is why learning to control their population is essential for maintaining a balanced ecosystem in your aquarium.
Why Dip Live Rock?
Dipping live rock before adding it to your aquarium is an essential step for a few reasons. First, it helps eliminate any unwanted pests, like bristle worms, that could disrupt your tank’s harmony. Think of it as a quarantine process, giving your rock the chance to shed any hidden critters. Second, it helps remove any potential contaminants or debris that could harm your fish or corals.
Another benefit is that dipping can stimulate any beneficial bacteria on the rock to get going. By rinsing the rock in a dip solution, you can encourage the growth of helpful microorganisms without introducing the bad guys. It’s like giving your new rock a fresh start!
Preparing for the Dip
Before diving into the dipping process, there are a few things you’ll need to gather:
- Bucket: A clean, food-safe bucket is essential for mixing your dip solution.
- Dip Solution: You can use a commercially available coral dip or mix a solution of aquarium salt and fresh water.
- Tools: Gloves, a small brush, and a net or sieve will come in handy during the process.
- Water Temperature: Ensure that the water is similar to your aquarium’s temperature to avoid shocking the organisms on the rock.
Once you have your supplies ready, you’ll be set to start the dipping process.
How to Dip Live Rock
Dipping live rock is pretty straightforward. Here’s a simple step-by-step guide to help you through the process:
1. **Mix the Dip Solution:** Start by filling your bucket with enough water to fully submerge your live rock. If you’re using a coral dip, follow the instructions on the label to mix it properly. If you’re using salt, mix about a cup of salt per gallon of water.
2. **Submerge the Rock:** Carefully place the live rock into your bucket of dip solution. It’s okay to be gentle; you don’t want to break any pieces.
3. **Agitate Gently:** Use your brush to gently scrub the surface of the rock, especially any crevices where bristle worms might hide. This will help dislodge any unwanted pests.
4. **Soak Time:** Leave the rock submerged for about 5 to 10 minutes. Keep an eye on it—if you see any bristle worms escaping, you’re doing it right!
5. **Rinse and Transfer:** After soaking, take the rock out and rinse it briefly in fresh seawater or aged saltwater. This helps remove any lingering dip residues before placing it in your tank.
What Happens After Dipping?
Once you’ve dipped and rinsed your live rock, it’s ready to go into your aquarium. But here’s the thing: you might notice that some unwanted critters still find their way in, even after you’ve dipped. That’s because some pests can be quite sneaky and hide deep within the rock. It’s a good idea to keep an eye on your tank in the following weeks.
Regularly inspect your live rock for signs of bristle worms or other pests. You might want to introduce some natural predators, like certain types of fish or invertebrates, that will help keep them in check. It’s all about maintaining that balance in your tank!
Alternatives to Dipping
While dipping is effective, you might have other options if you’re looking for a different approach. Here are a couple of alternatives:
– **Quarantine Tank:** Setting up a quarantine tank for new live rock allows you to monitor and treat any pests without risking your established aquarium. This can be more effective but requires more setup and time.
– **Natural Predators:** As mentioned earlier, introducing animals that naturally feed on bristle worms, like some types of wrasses or arrow crabs, can help control their population without any dips.
– **Chemical Treatments:** There are specific chemicals designed to target pests in aquariums. However, these can be risky and may harm beneficial organisms, so use caution.
Understanding how to effectively dip live rock to eliminate bristle worms is a game-changer for maintaining a healthy aquarium. By taking the time to properly dip and prepare your live rock, you’re setting the stage for a thriving ecosystem. Remember, continuous monitoring and care are essential—even after the dip.
With a little patience and diligence, you can enjoy a beautiful, balanced aquarium without the nuisances of bristle worms. And don’t forget, keeping a saltwater tank is all about learning and adapting! Happy aquascaping!